
Game Components
Table Layout
- 1 battlefield/board
- 2 player mats
- 2 token holders
Condition Tokens
- Wounded: 12 Blood Drop tokens
- Weaken: 12 Modifier tokens
- Charge: 6 Lightning Bolt tokens
- Surge: 2 Catapult tokens
Score Tokens
- 2 Score Bars
- 2 Score Indicators (red/gold)
Phase Tokens
- 2 Move (1 red, 1 gold)
- 2 Reposition (1 red, 1 gold)
- 2 Attack (1 red, 1 gold)
- 2 Assault (1 red, 1 gold)
- 2 Charge (1 red, 1 gold)
- 2 Reserve Power (1 red, 1 gold)
- 1 Initiative (white)
The Power Deck
- 2 9-card decks
The Cycle Counters
- A pair of tokens numbered 1 – 4. One for each player.
Domain Cards (Your Forces)
- 15 different Domains of 30 cards each.
- 3 Stronghold tiles for each Domain. 45 tiles total.

Winning the Game
High Score
A player has seven Victory Points (VP) at the end of a round.
Or
The player with the most Victory Points (VP) after the last card of both players’ fourth cycle of the Power Deck is played.
(Optional)To the Bitter End!
Players can decide at the start of the game that there will be no ties. If so, at the end of the final round, if the score is tied, players will continue battling, checking the score at the end of each round until there is a winner.
Board Configuration
Each player has two rows of spaces to defend (their Domain). Each Domain is separated by a row called the Neutral Line.
The six spaces surrounding the stronghold is the Assault Zone. Players score VP (Victory Points) by getting cards into their opponent’s assault zone and launching a successful assault. Successfully defending your assault zone makes it harder for your opponent to score.

Card Anatomy
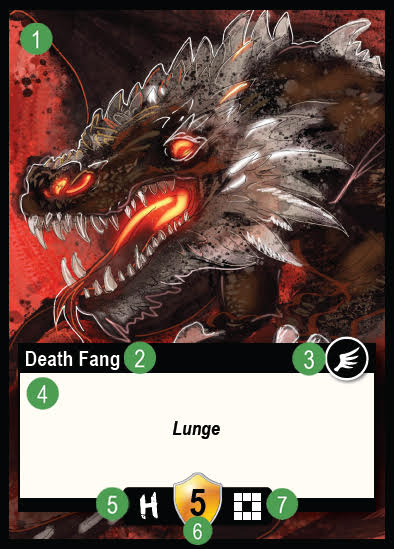
- Card Art by Ariel Fender
- Card Name
- Fly Icon
- Ability Text Box
- Card Type (Hero, Elite, Warrior)
- Attack Strength
- Range (Radial or Standard) (move and attack)
Let’s Play Dominum
Select Your Domain and Forces
- Select a Domain from one of the 15 options
- Build your forces:
- 1 Stronghold card
- 1 Hero card
- 4 Elite cards
- 7 Warrior cards
Game Board and Pieces Setup
At setup:
- Your Stronghold card is placed face-up with two Charge tokens.
- Your 12 cards (forces) are placed face down or held in your hand. Opponents only see these cards when played to the board.
- Place score bar/indicator, Power Deck, and Phase tokens onto the designated locations on the player mat.
- Place Wound, Weaken, Surge, and extra Charge tokens in the trays.
- Place Initiative token in between the two player mats in a location clearly visible to both players.
Once setup is complete, the game may begin.
The Game
Determine the First Player
Each player shuffles their Power Deck, offering it to their opponent to cut, then draws the top two power cards and places them face-up on their respective Reserve power locations on the mat. This is known as a Power Deck reset.

The player with the higher total of the two face-up power cards (a critical card counts as 4) decides who will be the 1st Player (making the other player the 2nd Player). Players will have these designations for the entire game.
In the event of a tie, flip a coin.
Initial Deployment
Players will alternate placing cards during initial deployment.
- Initial deployment begins with the 1st Player. That player selects one card from their hand of twelve cards and places it into any space within their Domain. Then the 2nd Player does the same.
- A second card is placed into the domain by the 1st Player from their hand of eleven, followed by the 2nd Player into their Domain.
- Then a third card.
- They continue to alternate until there are 6 cards initially deployed.
- IMPORTANT: One of the final 3 cards placed during initial deployment must be put into a space in the Neutral Line. It can be any of the final 3 cards. That’s up to the player to decide.
The initial deployment is the start of the game. As such, cards with On Deploy abilities will trigger as normal. This means some domains have tricks up their sleeve and may look to get an immediate advantage. It is critical that you protect your Fortified Spaces right away. Most players will put their first two cards into those spaces during initial deployment. But, of course, the choice is yours.
For example:

- The Shadowblade can itself be deployed into the neutral line for the cost of 1 Charge. This would give the Elf Domain player two cards in the neutral line during initial deployment.
- The Disciple of the Sky has a very strong ability, being able to spend 1 Charge and allowing an ally Warrior card (already in play) to move immediately. This could put that warrior into the opponent’s assault zone! When playing against the Freemen, one must bear this in mind.
- The Flesh Hunter of the Shy-Lorr can make a free strike with Lunge when it deploys, giving it the ability to ambush the enemy right away.
Rounds. Turns. Phases.
The game length is determined by cycles of the Power Deck. During these cycles, several rounds will be played. In the rounds, players will alternate activating phases during their turn. The player turns are staggered, simulating the tumult of battle. This play structure is a bit unorthodox, but players will find layers of tactical depth within.
After initial deployment, the first round begins with the 1st Player.

The procedure:
- At the beginning of a player’s turn, they select one Phase token, chosen from among the available eight options (including the Initiative token).
- They place that token into the space labeled 1.
- They perform the actions of that phase.
Then, the 2nd Player does the same, selecting a token and performing the associated actions.
Players alternate turns, back and forth. Once both players have activated five phases, the round is over, Phase tokens are reset, and a new round begins.
Linking Two Phases Together
IMPORTANT: Each player has a Link token. During the round you can use your Link token once to activate two phases back-to-back. Linking phases is very powerful but not required.

In this example, the player started their turn with the deployment phase. Then passed to their opponent.
Once their opponent activated a phase, the player decided to use their link token and activate both the move and attack phases before passing to the opponent.
The player’s third activation for the turn was to draw reserve power.
Their fourth activation was the assault phase. After the actions of the assault phase were completed, the player’s turn was now over because they had used all five of their phase activations.
End of Round
Once both players have activated five phases and ended each of their turns, the round ends.
- If a player has 7 victory points, they are the winner. Otherwise ….
- Players remove their Phase tokens and Link tokens from the turn track.
- The next round begins with the 1st player activating a phase (or two if they link!). Unless the previous round they used a phase to gain the initiative token then they start the next round.
The Power Deck

The Power Deck is a set of 9 cards.
As players take attack actions, perform assaults, and use various card abilities, power cards will be used to determine the results.
“Draw Power”
- When this phrase is used, the player flips the top card of the Power Deck, revealing the number to all players.
- Alternatively, the player can opt to use one of the power cards on their reserve board.
- Once a power card is used, it is placed into the player’s used pile, adjacent to the Power Deck.
Reset
To reset your Power Deck, gather all nine cards, shuffle them, offer a cut to your opponent, place the top two cards (face up) on your reserve board, and place the Power Deck down.
Cycling
Cycling the Power Deck is different from a reset. Each time a player uses all nine of their power cards, suspend play and do the following:
- Select any one of the Cycle Counters and place it to the side. Note the number.
- Gather the nine cards from your used pile, pull out a power card that has the same value as the counter you set aside. Place that card, face up, on your reserve board.
- Shuffle the remaining eight power cards and offer a cut to the opponent.
- Draw the top card and place it on the reserve board.
- Place the Power Deck face down. You now have 7 cards in the Power Deck and 2 on your reserve board.
- You have one less Cycle token.
- Resume play.
Cycle Counters
Each player has 4 Cycle Counters. As the game progresses, power cards are used, and the decks cycled. The counters track the game’s progress. After the last player has cycled 4 times, the game will conclude at the end of that round.
There is an opportunity for strategy in the way you choose to remove your Cycle Counters. Over the course of the game, you will have the ability to shape your reserve board with 1, 2, 3, and 4 value cards.
The Critical Card
There is one card without a set value, the Critical.
- When used in combat, using this card automatically causes a wound if you are the attacker unless your opponent also draws a critical for the block. If you are a defender, playing the critical will automatically block an attack no matter how high the attack total.
- When used in an Assault, the critical card has a value of 4.
- When used in a Power Duel, the critical automatically wins.
IMPORTANT
When a power draw is needed, both players DO NOT flip at the same time. The player taking the action (the active player) always draws first and says out loud what the total is. The opponent then decides whether to use one of their power cards.
- In an attack, the attacker must always draw power to have a valid attack. The defender then chooses whether also to draw power or not.
- Similarly, in a Power Duel, the player initiating the duel draws power first and the opponent, seeing the result, then decides to draw power or not.
Power Duels
A power duel is when players each draw power and the high card wins, with ties going to the opponent (like the old card game of War from back in the day). Reset: gather all nine cards, shuffle them, offer a cut to your opponent, place the top two cards (face up) on your reserve board, place the Power Deck down. This does not use a cycle counter.
Abilities
Abilities are located in the text box on the card. Many of these abilities are “always active” and grant the card a unique way of interacting with the rules.
Phase Activation
Many abilities are only available during certain phases indicated on the cards.
Activated Abilities
These abilities will often have a cost in Charge tokens to activate and are optional to use.
IMPORTANT: These abilities can only be used ONCE per phase and only last until the end of that phase.
Keyword Abilities
- Alt Attack: This attack is optional and can be used at time indicated on the card. This ability can be used in addition to their attack during their attack phase.
- Barrage: A card with barrage adds +1 to your assault total if it is in the neutral line. You must have a card within your opponent’s assault zone to launch a valid assault.
- Deadly: Cards with deadly win ties when they attack, counterattack & make free strikes.
- Evasive: When this card’s attack is blocked, it may immediately shift. If it does, it cannot be counterattacked.
- Free Strike: An attack that, if blocked, cannot be counterattacked.
- Knockback: When a card with knockback wounds a Non-Hero enemy, you may shift that enemy. Resolve the knockback before resolving other effects (such as wound triggers).
- Lunge: This card may shift before making an attack. Additionally, when a card that lunges(shifts) draws power – before declaring the attack total – it may draw a second card and use that card for the attack total instead (ignore the first draw).
- Outflank: Coordinated attacks that include this ability become free strikes.
- Submerge: During your opponent’s attack phase, when you block an attack, instead of making a counter attack, place this card into any open space within its range.
Triggered Abilities
These abilities are conditional, and their effect occurs when a trigger or condition is met.
- Infiltrate: Active only if you are in your opponent’s Domain.
- Protector: Active only if you are in your own Domain.
- 1st wound: The effect happens when you take your first wound. Mandatory.
- On Discard: Active only if a card leaves the battlefield after receiving a second wound and is placed in the BattleField Casualties pile. Ability does not activate if the card is “sacrificed”.
Conditions
Wounded
- A card with one Wound token.
- A second wound defeats a card, and it is discarded from play.
Weakened
- During the game, cards can be weakened by abilities of different cards and Strongholds. When weakened, place a green poison token on the card and this indicates the card’s attack and defense strengths are -1. Weakens can not be staked.
Charged
- Refers to your stronghold. It is either charged (one or more tokens) or not charged (no Charge tokens).
Strongholds
- Strongholds can have up to 3 Charge tokens.
- Every Stronghold has a unique ability, which synergizes with that Domain.
- A Stronghold ability can only be used once in a turn unless otherwise stated on the ability.
Phase Breakdowns
Deploy Phase

- If you have less than 6 cards on the battlefield, you may deploy a number of cards from your hand, one at a time, until you reach the battlefield limit of 6.
- To deploy a card, select it from your hand and place it into any empty space within your Domain.
- If the card has an ability that reads “On Deploy:” you must choose to use that ability immediately once you deploy that card, otherwise the ability is lost.
- Alternatively, before you deploy any cards, you are allowed to Retreat 1 card from the battlefield. To retreat a card, remove it from the battlefield and place it in the discard pile. You might want to do this to free up an important space, or you might want to remove a wounded card, strengthening your board presence with a new card.
- Note: a card that retreats cannot use its “On Discard:” ability if it has one. (the same as the sacrifice rule, mentioned later)
Move Phase

- During your move phase, each card can move into a new space on the board.
- All cards can move up to 3 spaces.
- Cards cannot end up in the same space as where they started. If a card moves at all, it must end its move in a new space.
- Cards move according to their range indicated on the card, either Radial (diagonal or orthogonal) or Standard (only orthogonal).
- Your cards can move through ally cards but not enemy cards.
- All cards can move through the 2 Stronghold spaces.
- FLYING cards can move “over” all enemy cards. They can move diagonally. This gives them significant battlefield reach.
- You move your cards one at a time.
- Once a card has moved, it cannot be moved again.
Attack Phase

- During your attack phase, each card can make an attack against an enemy within its range.
- To make a valid attack, a card must:
- Target an enemy within its range.
- Draw power.
- Add the number of the power card to the attacker’s attack strength.
- Attacks produce one of two results:
- Success – If your attack total is greater than your opponent’s defense total, that enemy receives a wound token.
- Enemies that receive a second wound token are defeated and immediately discarded from play.
- Failure – If your attack total is less than or equal to your opponent’s defense total, that enemy has blocked your attack.
- Enemies that block attacks may make a single Counterattack against who attacked them. If a coordinated attack is blocked, the counterattack is toward the primary attacker only.
- Success – If your attack total is greater than your opponent’s defense total, that enemy receives a wound token.
- Cards have only one attack per phase.
- As noted in the Power Deck section, it is important that the attacking player use their power card first and then speak out loud the attack total. Only then does the defending player decide how they want to respond to the attack and whether to draw power or not. Defending players cannot be forced to draw power.
Coordinated Attacks
- You can attack a single enemy with multiple allies, giving you a greater attack total.
- When you declare your attack, tell your opponent which of your cards are coordinating. The enemy card must be with the ranges of all the attackers.
- Designate which card is the PRIMARY attacker. You will use their attack strength as the base attack number.
- Each other card in the coordination will add a +1 to the attack total.
- When a card participates in a coordinated attack, it uses its attack action for the turn. It cannot attack another enemy.
- Only the abilities of the PRIMARY attacker can be used against the defender. The exception to this is Outflank.
- Coordinated attacks are a great way to gang up on a powerful card.
Assault Phase

- You must have at least 1 card within your opponent’s Assault Zone to select and activate the Assault Phase.
- For each ally card in your opponent’s Assault Zone, add 1 to your initial assault score.
- If an ally card is in the fortified space, add 2 to the initial assault score instead.
- Once you know the initial assault score, draw two power cards and add both to the initial score to get your Assault Total.
- If the total is 8 or less: 0 VP (Victory Points). Collect your Surge token. Place it on your Stronghold.
- If the total is 9 or 10: 1 VP.
- If the total is 11 or more: 2 VP.
- If you have your Surge token when you assault, you may use it to add +1 to your Assault Total. If you do, place it back on the side of the board, to be gathered again later if need be.
- If you assault when you only have one card left to play in your Power Deck then draw that card. Commit it to memory and cycle your deck. You may now select the next card from either Reserve Power or Drawing to complete your assault.
Reposition Phase

- Each card gains the opportunity to shift into an adjacent, empty space on the board. One space only.
- Note: A shift is orthogonal, not diagonal.
Reserve Phase

- Draw one power card from the top of your Power Deck and place it, face up, on your reserve board.
- If you already have 3 reserve power cards, you must discard one before drawing your new reserve power card.
- If you draw the last card in your Power Deck, this does not cycle your Power Deck. A cycle only occurs once you have used all 9 of your power cards, resulting in all 9 cards in your used pile.
Charge Phase

- Add 2 charge tokens to your Stronghold OR remove 1 Weaken token from an ally.
Game Terms
1st wound
- The effect happens when you take your first wound. Mandatory.
Adjacent
- The spaces above, below, and to the sides are adjacent. Diagonal is never adjacent.
Advancing
- Whenever an ally defeats an adjacent (not diagonal) enemy, that ally can advance into that space. This advance is considered a shift.
- NOTE: You can only advance if you defeat an enemy with an attack or counterattack.
Alt Attack
- This attack is optional and can be used at time indicated on the card. This ability can be used in addition to their attack during their attack phase.
Attack
- On your turn, during your attack phase, a card targets an enemy within its range and draws power. The result is your attack total.
Block
- When attacked (or counterattacked) and your defense total is equal to or greater than the attack total.
Counterattack
- After a successful block, you may make an attack against the attacker. They can defend as normal.
Defeat
- When a card suffers 2 wounds and therefore is discarded.
Free Strike
- An attack that, if blocked, cannot be counterattacked.
Infiltrate
- Active only if you are in your opponent’s domain.
On Discard
- Active only when a card leaves the battlefield after receiving a second wound and is placed in the Battle Field Casualties pile.
Protector
- Active only if you are in your own domain.
Sacrifice
- Some abilities will sacrifice a card as an additional cost or effect. The card is immediately removed from play and discarded. If it has an On Discard ability, that ability is ignored.
Shift
- To move one space orthogonally (up, down, left, or right).